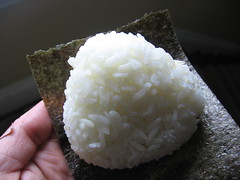
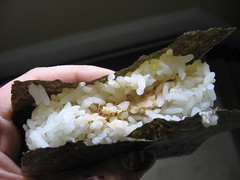
Onigiri = rice ball in Japanese, and for some reason the word musubi also means the same thing. Why there are two words i have no idea. For equally obscure reasons, people in Hawaii mostly use “musubi” especially for the spammy ones. ANYWAY. I have been making rice balls like a maniac lately, I think out of longing for the warm shores of Hawaii.
I make my rice according to JustHungry’s instructions, and I will say that you should follow these instructions to the letter. I tried a couple times to be lazy and just make short grain rice the same way I make jasmine rice, and it came out a grotesque sticky mushy mess. Be ye warned. If you sprinkle in a 1/2 tsp or less of salt per cup of rice, you can be lazier about salting the rice when you make the rice balls (see below).
The spicy mayo salmon filling I made up based on a similar spicy-tuna recipe in my Hawaiian recipe book, and is something along the lines of: 1 can salmon (ideally wild for best omega 3 nutrition), with condiments to your taste — about 1 dollop of mayo, a big squirt of sriracha sauce, a dash of chile oil, and a large sprinkling of japanese red pepper powder (could probably substitute cayenne or hot paprika). You can always make it spicier, so start small.
If you have a rice ball mold, it’s easiest, but you can do with any teacup or small bowl. Look around on justhungry.com or justbento.com for instructional post. I made mine in the tops of these adorable little things, which both makes perfect onigiri and fulfills your daily requirement of Cute with a capital C. Thanks to Maki for finding the boxes! Basic idea is line bowl/cup/mold with saran wrap, dip your fingers in a bowl of water and spritz the wrap, then sprinkle a little bit of salt (skip if you salted the rice and are lazy). Put in about half the rice you want, enough to loosely cover the bottom of the vessel. Spoon in some filling — not too much, or it won’t be fully enclosed by the rice, but I do use more than commercially made onigiri do, and i spread it around the whole width of the rice ball, leaving about 1/4″ border. You can press down on the filling and rice a little bit with the spoon at this point to start compressing it. Add the other half of the rice on top. Wet your fingers to keep the rice from sticking to you, and pat the rice into shape. Cover the rice with the edges of the saran wrap and compress it into a tidy shape. Sometimes the best thing to do is gather the edges and twist, to tighten up the whole works at once. In any case, you are now done.
You can leave it wrapped up and take it that way for lunch, or you can transfer it to a cellowrapped piece of nori and tape it closed and carry it that way. Whatever. If you like the nori, but can’t find the fancy pre-wrapped stuff, just buy sheets of it, cut to size if necessary, and bring it along in a separate baggie, or tucked in outside the saran wrap, and wrap the rice ball in it when you are ready to eat it. It will only stay crunchy about 20 seconds after being in contact with the rice. (Sometimes nori is labeled laver, especially in white-folks markets.)
You can do them in lots of shapes: round balls, flat rounded triangles like I did, logs, etc. — just mush the rice around inside the wrap into shape. 1 cup of sushi rice made according to justhungry method made the 3 filled balls + 1 smaller ball that I brought last night to our chip tasting party.
Other fillings: tuna salad, ume/shiso paste, pickles of any kind (pat dry), canned fish of any kind, salted fish (even lox pieces), or pretty much whatever is soft, dry and flavorful enough to go in there and not make a mess. You can also mix in dried or small stuff directly to the rice, and just make a ball out of that rather than filling plain rice — you can mix in furikake, or peas, or finely chopped vegetables or spice mix, whatever.
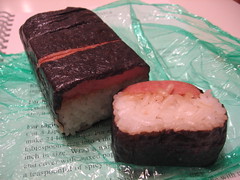
Of course I made some Spam musubi too. The recipe in that link is pretty good and quite detailed, but bear in mind that you don’t need the furikake unless you like it, and that you can put the Spam on the bottom, top with rice, and then wrap in nori the way I did (and the way it is on Kaua’i). Also the teriyaki sauce is optional, it can be just fried Spam.
And I do suggest salting the rice while cooking for this application (1 tsp kosher salt per 2 cups rice). 2 cups sushi rice & 2.25 cups water, made according to the justhungry method, will be the perfect amount for 1 can of Spam. No need to saran wrap if you’re gonna just eat it on the spot, but to transport, wrap in saran wrap, smooth off the corners, and eat within the day. If you put extra in the fridge, just microwave for 45 seconds to un-harden the rice. The musubi mold does make this really easy, but if you don’t have one, use same principles of compress-rice-through-saranwrap as above to get the general log-shape. Or try using the Spam can, as one of the commenters suggests on that instruction post. My Spam musubi above is cut into four slices, for serving as an appetizer at a party.
For the pickles, slice cucumber and radish (daikon is good if you have it, regular radishes tint everything a pretty pink, you can do cuke alone, radish alone, or whatever… carrots are nice with radish if you feel like it, etc.) and sprinkle with kosher salt so that every piece gets a little salt. Then stuff ’em into a container, shake ’em around and let ’em sit for a while. If you’re in a rush, you can just add the vinegar right away, but i think sitting for 30 mins with the salt makes them nicer. Anyway, pour rice vinegar into the container so the veg are almost covered. Let sit 30-60 mins. After that, good to eat and will keep in fridge for at least a week. To vary, you can add a tsp of sugar and/or chili pepper and/or 1 or more sliced garlic cloves to the mix.
Go forth and eat delicious Japanese lunches!


