I’ve been reading Fat: An Appreciation of a Misunderstood Ingredient, with Recipes, which by the way you should run out and buy, and in it I learned that science has recently proven that a compound in chicken fat, specifically chicken fat, strengthens the human immune response. Your Jewish gramma wasn’t just whistling Dixie. We knew this anecdotally, since tallasiandude responds really well to chicken soup when sick, but it was cool to see the science behind it.
Anyway, in an effort to fight off the illness we both can’t shake, we have been eating a LOT of chicken soup in this house lately. Like 3 big batches in the last week and a half. And though I do adore the tallasiandude’s recipe for chicken vegetable soup, there’s apparently only so much I can eat at a go. So I decided I would make chicken pho for the next batch, and see if I could pull it off.
I googled (thanks to Andrea Nguyen’s post for the correct Viet characters which I shamelessly copied and pasted, and to Steamy Kitchen’s post for the recipe I followed), ran out for ginger and bean sprouts, and had at it while I was working today.
It came out OK, but it wasn’t even CLOSE to flavorful enough. It smelled absolutely dreamy, but the taste wasn’t anywhere near that heady, strong, savory luxury that I love in pho ga.
I could maybe put in more onion, but really I followed the recipe almost exactly. The only thing I can think of is that I didn’t hack up the chicken with a cleaver, therefore depriving my broth of all the bone marrow. Steamy Kitchen makes a point of going on at some length about the marrow and what it adds to the broth. But to be completely honest, I am not the most coordinated girl and I am scared of cleavers. I get the willies watching the guys in the Chinese market hacking stuff up, and those guys know what they’re doing.
Maybe I can get a really sharp cleaver, and hold down the object to be cloven with a long meat fork or something.
Because even though it was certainly edible and warming with lime and sriracha added to it, the pallidness of my phở gà just made me sad. Something has to be done, at least until someone opens up a Vietnamese restaurant within 5 miles of my house. Anyone? Anyone?
Category: In the Kitchen
onigiri / musubi & pickles
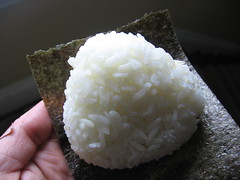
Onigiri = rice ball in Japanese, and for some reason the word musubi also means the same thing. Why there are two words i have no idea. For equally obscure reasons, people in Hawaii mostly use “musubi” especially for the spammy ones. ANYWAY. I have been making rice balls like a maniac lately, I think out of longing for the warm shores of Hawaii.
I make my rice according to JustHungry’s instructions, and I will say that you should follow these instructions to the letter. I tried a couple times to be lazy and just make short grain rice the same way I make jasmine rice, and it came out a grotesque sticky mushy mess. Be ye warned. If you sprinkle in a 1/2 tsp or less of salt per cup of rice, you can be lazier about salting the rice when you make the rice balls (see below).
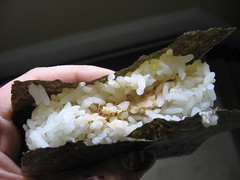
The spicy mayo salmon filling I made up based on a similar spicy-tuna recipe in my Hawaiian recipe book, and is something along the lines of: 1 can salmon (ideally wild for best omega 3 nutrition), with condiments to your taste — about 1 dollop of mayo, a big squirt of sriracha sauce, a dash of chile oil, and a large sprinkling of japanese red pepper powder (could probably substitute cayenne or hot paprika). You can always make it spicier, so start small.
If you have a rice ball mold, it’s easiest, but you can do with any teacup or small bowl. Look around on justhungry.com or justbento.com for instructional post. I made mine in the tops of these adorable little things, which both makes perfect onigiri and fulfills your daily requirement of Cute with a capital C. Thanks to Maki for finding the boxes! Basic idea is line bowl/cup/mold with saran wrap, dip your fingers in a bowl of water and spritz the wrap, then sprinkle a little bit of salt (skip if you salted the rice and are lazy). Put in about half the rice you want, enough to loosely cover the bottom of the vessel. Spoon in some filling — not too much, or it won’t be fully enclosed by the rice, but I do use more than commercially made onigiri do, and i spread it around the whole width of the rice ball, leaving about 1/4″ border. You can press down on the filling and rice a little bit with the spoon at this point to start compressing it. Add the other half of the rice on top. Wet your fingers to keep the rice from sticking to you, and pat the rice into shape. Cover the rice with the edges of the saran wrap and compress it into a tidy shape. Sometimes the best thing to do is gather the edges and twist, to tighten up the whole works at once. In any case, you are now done.
You can leave it wrapped up and take it that way for lunch, or you can transfer it to a cellowrapped piece of nori and tape it closed and carry it that way. Whatever. If you like the nori, but can’t find the fancy pre-wrapped stuff, just buy sheets of it, cut to size if necessary, and bring it along in a separate baggie, or tucked in outside the saran wrap, and wrap the rice ball in it when you are ready to eat it. It will only stay crunchy about 20 seconds after being in contact with the rice. (Sometimes nori is labeled laver, especially in white-folks markets.)
You can do them in lots of shapes: round balls, flat rounded triangles like I did, logs, etc. — just mush the rice around inside the wrap into shape. 1 cup of sushi rice made according to justhungry method made the 3 filled balls + 1 smaller ball that I brought last night to our chip tasting party.
Other fillings: tuna salad, ume/shiso paste, pickles of any kind (pat dry), canned fish of any kind, salted fish (even lox pieces), or pretty much whatever is soft, dry and flavorful enough to go in there and not make a mess. You can also mix in dried or small stuff directly to the rice, and just make a ball out of that rather than filling plain rice — you can mix in furikake, or peas, or finely chopped vegetables or spice mix, whatever.
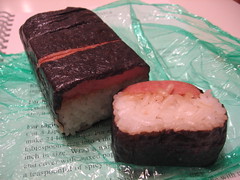
Of course I made some Spam musubi too. The recipe in that link is pretty good and quite detailed, but bear in mind that you don’t need the furikake unless you like it, and that you can put the Spam on the bottom, top with rice, and then wrap in nori the way I did (and the way it is on Kaua’i). Also the teriyaki sauce is optional, it can be just fried Spam.
And I do suggest salting the rice while cooking for this application (1 tsp kosher salt per 2 cups rice). 2 cups sushi rice & 2.25 cups water, made according to the justhungry method, will be the perfect amount for 1 can of Spam. No need to saran wrap if you’re gonna just eat it on the spot, but to transport, wrap in saran wrap, smooth off the corners, and eat within the day. If you put extra in the fridge, just microwave for 45 seconds to un-harden the rice. The musubi mold does make this really easy, but if you don’t have one, use same principles of compress-rice-through-saranwrap as above to get the general log-shape. Or try using the Spam can, as one of the commenters suggests on that instruction post. My Spam musubi above is cut into four slices, for serving as an appetizer at a party.
For the pickles, slice cucumber and radish (daikon is good if you have it, regular radishes tint everything a pretty pink, you can do cuke alone, radish alone, or whatever… carrots are nice with radish if you feel like it, etc.) and sprinkle with kosher salt so that every piece gets a little salt. Then stuff ’em into a container, shake ’em around and let ’em sit for a while. If you’re in a rush, you can just add the vinegar right away, but i think sitting for 30 mins with the salt makes them nicer. Anyway, pour rice vinegar into the container so the veg are almost covered. Let sit 30-60 mins. After that, good to eat and will keep in fridge for at least a week. To vary, you can add a tsp of sugar and/or chili pepper and/or 1 or more sliced garlic cloves to the mix.
Go forth and eat delicious Japanese lunches!
chicken pozole
A long time ago, I ordered some dried posole corn from Rancho Gordo, and I’ve been trying to find the right opportunity to score some low-rent pig parts and make the delicious soup, but it just never comes around right somehow. And it’s been long enough that I’ve started to worry about the integrity of that corn — it would be just wrong to let it go stale and rancid.
So this morning, when I found myself with the remains of a roast chicken in the refrigerator, and a gray, rainy, cold spring morning making me shut all the windows and think happy soup thoughts, I thought maybe I could make a chicken-based pozole instead of the traditional pork-based one.
I consulted Rick Bayless’s recipes for ranchero chicken soup and pork pozole rojo, and came up with the following method.
Pick the chicken carcass, saving the meat for the soup later, and put it in the stock pot with one onion (peeled but left whole and thrown in also), some peppercorns and a teaspoon of Mexican oregano, then bring to a boil and simmer as usual for the few hours it usually takes.
Put the posole corn into a pot with about 4 quarts of water (I used my larger saucepan) and a head of garlic, cloves peeled and halved. Bring this to a boil, then reduce heat for a low simmer, partially covered. Rick says 5 hours for dried corn, so that’s what we’ll do. (Actually it took more like 7 or 8, but whatevs.)
Soak the guajillo chiles in hot posole water until soft, then puree… strain into corn and liquid, then put in broth, add salt, and simmer 1 hour. Put the pulled chicken in. Top with radishes, cabbage or lettuce, chopped onion, tortillas or tortilla chips, lots of lime to squeeze in, and maybe a li’l guacamole.
noodly thoughts
a couple of things noodle-related:
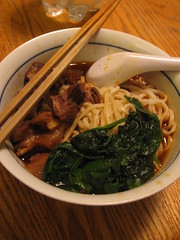
– tallasiandude has been meditating on the nu ro mian of his youth, and thinking that the plain wheat shanghai-style noodles we’ve been using are good but not quite the same as what he remembers… so when we spied some egg-white noodles of about the same size and shape from the same maker, we grabbed them to see if perhaps they might fit the bill. And they did, and how. They are chewier and more substantial, with a bit more flavor even, and they are spectacular in the beefy broth. All subsequent Noodlefests and nu ro mian endeavors shall be using this improved noodle!
– We tried some brown rice rotini from Trader Joe’s. We are occasionally seized by such insanity, in the blind hope that this time will be different from all the other times when non-durum pastas are just plain awful. And astoundingly, this time it wasn’t so bad. A little bland, but generally quite acceptable. I would recommend cooking them a little bit more than you would a normal pasta, because when one rotini (rotino?) is just perfect, some of the others still have undercooked cores. When it’s uniformly soft, you kind of don’t notice that it’s made of not-wheat when you’re eating it with a robust tomato-meat sauce. I think the fact that it is made with brown rather than white rice gives it a bit more body, texture and flavor. If I was gluten-intolerant, I would be entirely pleased with this product as a suitable vehicle for delicious sauces.
So that makes a total of two non-standard pastas that are decent: TJ’s brown rice rotini, and the whole wheat pasta from Big Y (Full Circle organic whole wheat pasta, apparently not the Big Y store brand, but that’s the only place we’ve found it locally).
lazy hummus, or parsley-chickpea salad
Somehow this preparation popped into my brain all of a piece. Mix one can drained and rinsed chickpeas, a handful of chopped parsley, a chopped scallion if you have one, juice of half a lemon, a slight drizzle of olive oil, and two big spoonfuls Sabra tahini sauce, plus a sprinkle of salt & pepper. You could also include diced cucumber and/or garlic if you were so inclined and had them on hand.
Notes on NoodleFest 09
We made our annual vat of nu ro mian last night, and we are in agreement that this is the best batch so far. A few things made it so:
– we upped the spicy even a notch further than last year, and that did the job. the bottles of chili oil went very nearly untouched at the table. 3 chilis + 3 tbsp of peppercorns + 10 tbsp spicy bean paste for the mild version, which was actually a little spicy. 14 chilis, 4 heaping tbsp of peppercorns and 12 tbsp spicy bean paste, three of them of the spicier type, for the spicylicious version.
– we found beef shank at the Kam Man market in Quincy, which is far superior in this application to the stewing beef from Costco. Loads more fat and connective tissue, and it shows in both the moistness of the meat (at last!) and in the richness of the broth.
– we went absolutely bananas with the tendon. Almost 7 pounds went into this thing, along with almost 11 pounds of shank. (Yes, we have rather a lot of leftovers.)
– we finally sorted out the logistics of large-scale noodle cooking. We bought a couple of cheapo electric range-burners at Target, and had one pot of water coming up to boil while the wide steamer-pot base was cooking 2 packs of noodles on the stove. This staging kept the noodles coming at a steady pace without suffering gumminess of any kind (unless they got left in the colander untaken for a while).
corned beef hash, yankee style
Note to self: leftover boiled dinner — corned beef, potato, carrot, turnip, cabbage, etc. — is somehow even more delicious when all components are diced up and reheated in a skillet with a spoonful of dijon mustard and a little pepper.
How this is different from eating them as-is on a plate with said mustard and pepper I am not entirely certain, but it is distinctly more delightful as a hash. Maybe I just really like hashes (I do).
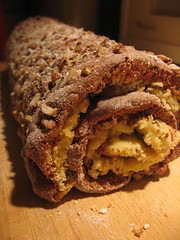
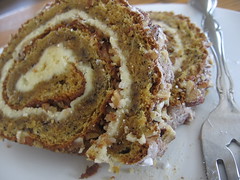
rolled banana pecan cake with cream cheese filling
I saw this recipe in Penzey’s One magazine, and it seemed quite appealing. I love banana cake, and I like things that seem fancy but aren’t actually complicated or fussy to create.
And then I found myself with extra packs of cream cheese to use up, and some overripe bananas, and the deal was done.
This recipe comes from a woman named Mary Harris, in Wasilla, Alaska. I do recommend subscribing to the magazine, as it is guilelessly charming and focuses on real people and the real stuff they cook and the reasons they cook it. Some of the recipes you might never make, but there are lots that you will, and some are real gems — and the magazine makes very good reading.
Despite running out of regular sugar and having to fill in with some light brown sugar, the recipe came out remarkably similar to the photo in the magazine. It looks FANCY. It tastes like fancy banana bread. This is by no means a slur; I love banana bread, and having it in a suitable-for-dinner-party format is awesome. The cream cheese filling recedes more than I expected it would, but it adds a bit of creaminess and moisture to the overall effect. I used neufchatel cheese and skim milk, so the recipe as a whole is relatively light and healthy, and a serving is just a little slice, so it makes a perfect sweet for the end of a larger or richer meal.
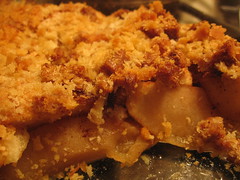
apple brown betty
I needed to clear out the last of the fall apples that were softening slowly in the back of the fridge, but I’m trying to hang on to this here wagon, so decided against a full-on pie. I thought I might do an oat-based crumble topping. I went looking in Joy of Cooking, found only sugary crisps, and then stumbled onto the brown betty section.
I’d heard of a brown betty, but didn’t exactly know what it was; i sort of assumed it was another dumpling/biscuit-based dessert like pan dowdy, slump, buckle, grunt, and all those other names for what is essentially the same damn thing. But it WASN’T. It was a buttered breadcrumb topping. And I ask you, what is not to like about that? Not too sweet, just a little bit savory, and asking nothing of me but to chowder up the bread ends littering my fridge.
And I had a bunch of crumbs waiting around, left over from my cocktail party adventures. So I diced up the last heel of wheat bread, sprinkled on the finer crumbs, and wound up with my new favorite apple dessert. It is best warm out of the oven, though — the crumbs sog up slightly if you let it sit. (Still good, though, I’m eating some right now.)
Peel, core and thickly slice 6-8 apples (mine were smallish, i used about 8) and put them into a baking pan. My pan was 10×6 rectangle, but whatever fits will do. Sprinkle over a handful of dark brown sugar, maybe 1/4 cup, and cinnamon to your liking, I did it by eye and it was maybe 1/2 tsp to a tsp. Toss them around to coat more evenly. Smush apples down a little, then top with the crumbs. I drizzled with about 4 tbsp of melted butter, but you could probably mix the butter and crumbs directly like it said in the recipe book, and it would coat it more evenly. I used salted butter and I like the effect of the salt on this dish. Bake at 350 for 45 min to an hour, until crispy and golden brown on top and the apples are soft.
back on the wagon
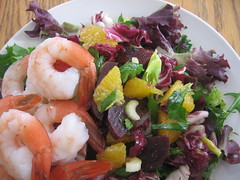
As mentioned, back on the wagon, or at least trying really hard to climb up there, dammit. All that Arizmendi stuff was so good. Anyway, today’s lunch was awesome:
expensive but delicious cooked shrimps from Whole Foods
salad greens from a box
salad topping of orange, beet, celery, scallion and parsley,
dressed in olive oil and rice vinegar, salt and pepper
YUM.
(ps the beets were ready roasted from Trader Joe’s cold case, so this was pretty much idiot-proof and really fast. those beets are just ok, nothing special, but they sure are handy.)
